


Blog

How to Check Your Car’s Oil: A Step-by-Step Guide

logo

Regularly checking your car’s oil is one of the simplest yet most important maintenance tasks you can perform to ensure your vehicle runs smoothly. 

Oil is the lifeblood of your car’s engine, reducing friction, minimizing wear, and keeping all the moving parts well-lubricated. Neglecting your oil can lead to severe engine damage and costly repairs. 

In this blog post, we’ll walk you through everything you need to know about checking your car’s oil, including why it’s important, how to do it, and what to look out for.


Why Is Checking Your Oil Important?

Your engine relies on clean, sufficient oil to function properly. Over time, oil can become dirty, lose its effectiveness, or even deplete due to leaks or consumption. If left unchecked, low or dirty oil can:

  • Increase engine wear and tear.

  • Cause overheating.

  • Lead to expensive engine repairs or replacements.

Regular oil checks ensure your car is running efficiently, prolong its lifespan, and save you money in the long run.


What You Need to Check Your Oil

Before you get started, gather these tools and items to make the process easier:

  1. Clean rag or paper towels – To wipe the dipstick.

  2. Gloves (optional) – To keep your hands clean.

  3. Flashlight (if needed) – For better visibility under the hood.


When Should You Check Your Oil?

To get the most accurate reading:

  • Check your oil when the engine is cold, or wait at least 10-15 minutes after turning off your car. This allows the oil to settle back into the oil pan.

  • Park the car on a flat, level surface. An incline can skew your reading.

Most manufacturers recommend checking the oil at least once a month or before long trips, but if your car is older or burns oil, more frequent checks may be necessary.


How to Check Your Oil in 6 Easy Steps

1. Locate the Dipstick

  • Open your car’s hood and secure it with the hood prop rod, if necessary.

  • Look for the dipstick, which is usually a brightly colored handle (often yellow or orange) near the front of the engine. If you’re unsure, refer to your owner’s manual.

2. Remove the Dipstick

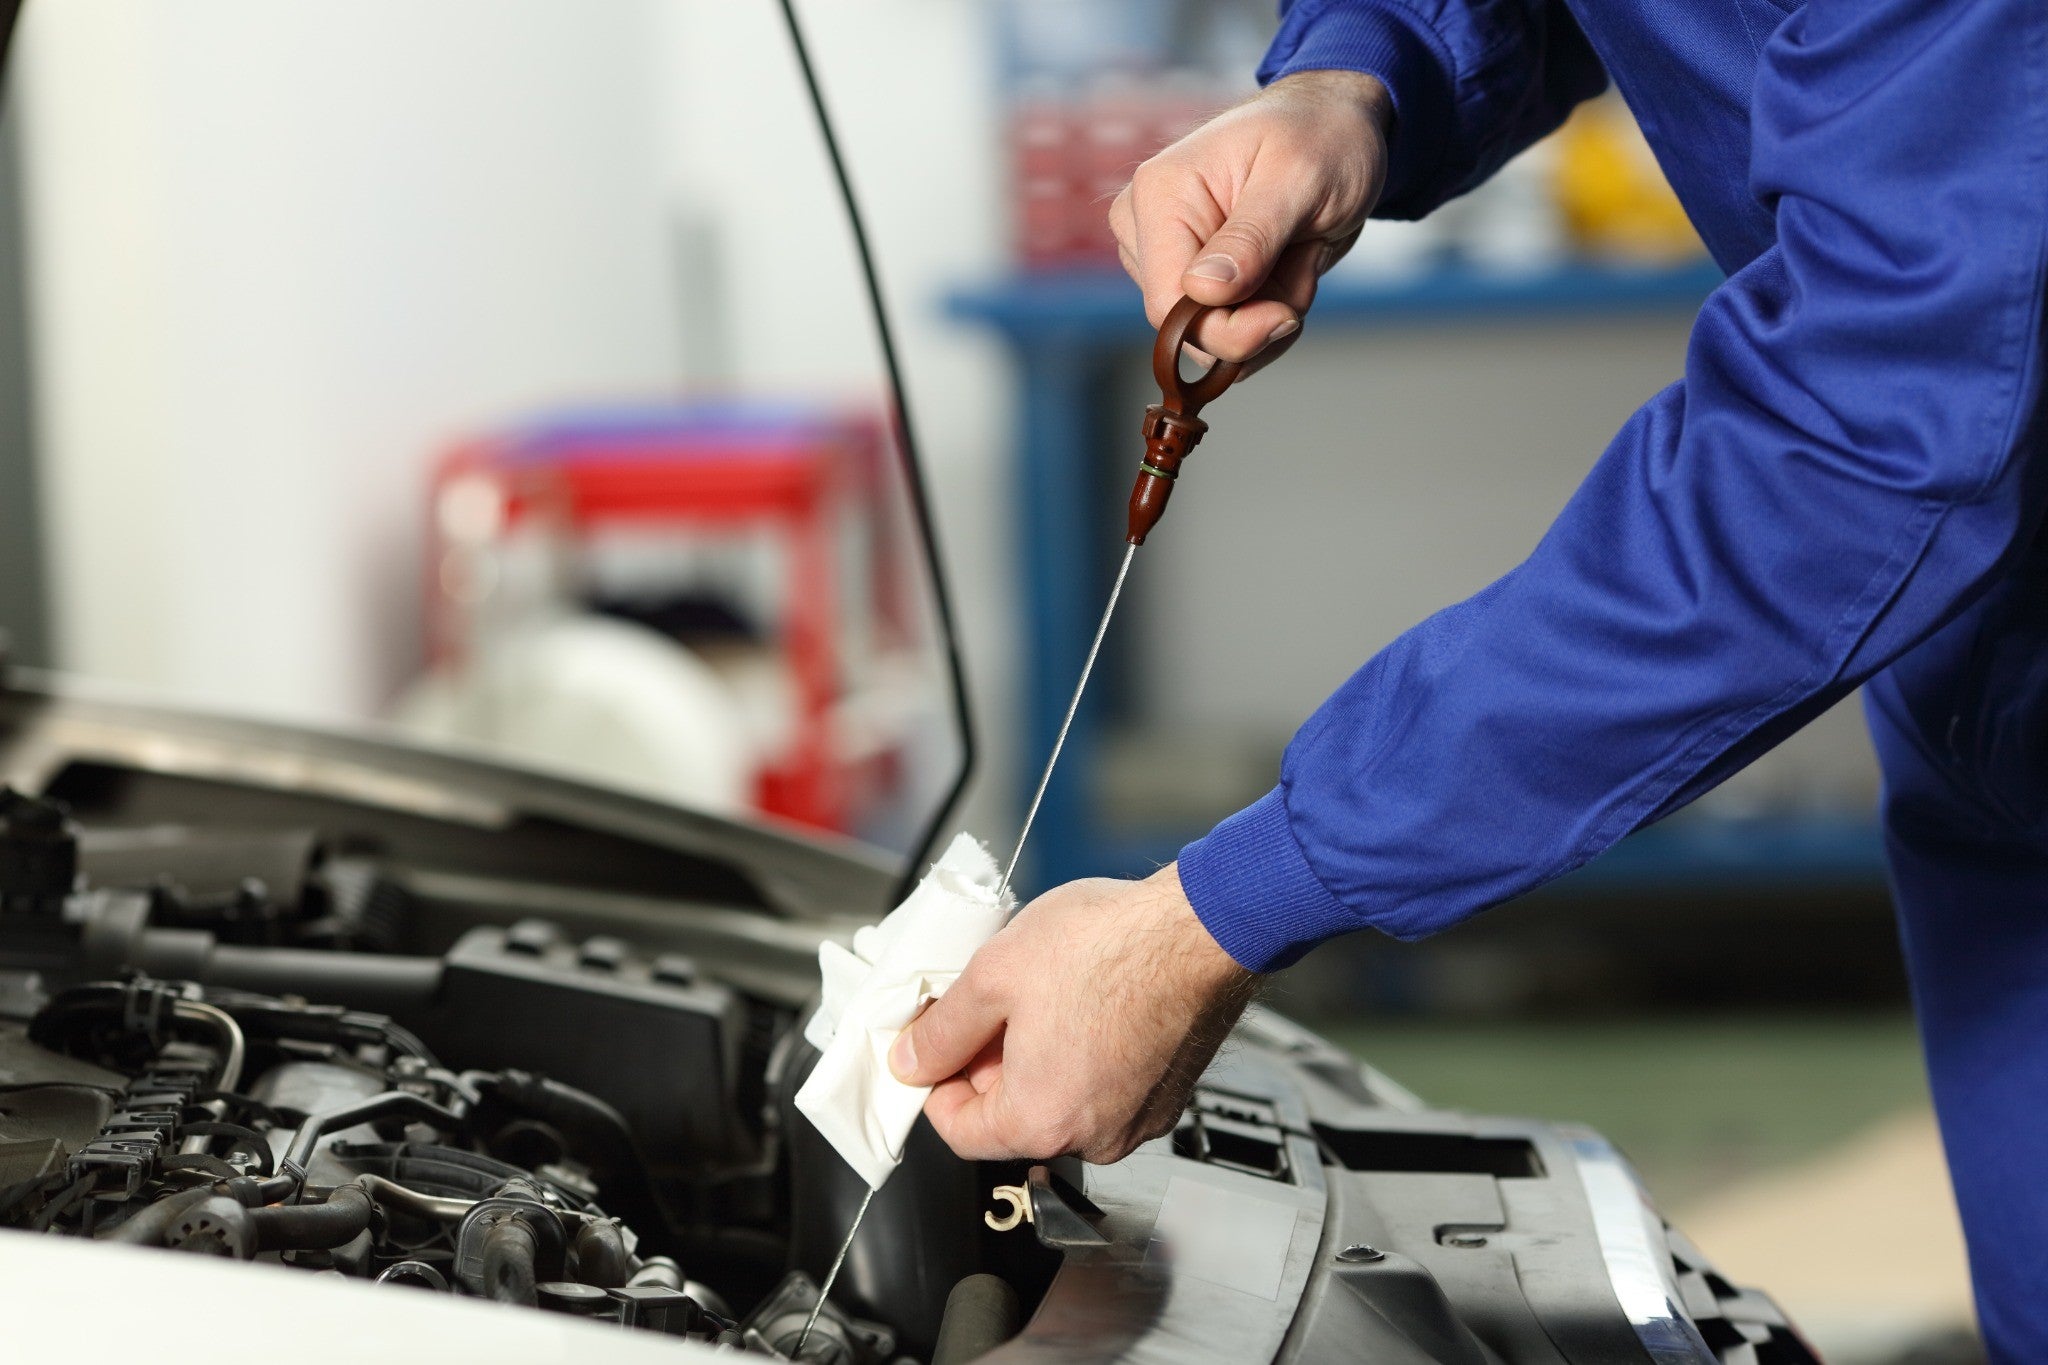
  • Pull the dipstick out of its tube slowly.

  • Have a clean rag or paper towel ready to wipe off the initial oil.

3. Wipe and Reinsert

  • Use your rag to clean the dipstick completely, removing any oil so you can get a clear reading.

  • Insert the dipstick fully back into its tube, making sure it goes in all the way.

4. Remove the Dipstick Again

  • Pull the dipstick out once more and hold it horizontally.

  • Look closely at the markings on the dipstick. Most dipsticks have two marks:

    • Full line: Indicates the maximum oil level.

    • Add line: Indicates the minimum acceptable level.
      The oil level should fall between these two marks.

5. Check the Oil’s Appearance

  • The oil should appear amber or light brown if it’s clean and fresh.

  • If it looks dark, gritty, or has particles, it may be time for an oil change.

  • Milky or frothy oil could indicate a coolant leak, which needs immediate attention.

6. Reinsert the Dipstick

  • Once you’ve checked the level and condition, securely place the dipstick back into its tube.


What to Do If the Oil Level Is Low

If your oil level is below the “Add” mark, you’ll need to top it off. Follow these steps:

1. Choose the Right Oil

  • Refer to your owner’s manual to find the correct oil type and viscosity for your vehicle. Using the wrong oil can harm your engine.

2. Add Oil Gradually

  • Locate the oil filler cap, which is typically marked with an oil can symbol.

  • Slowly pour in a small amount of oil (about a quarter of a quart) at a time.

  • Recheck the dipstick after each addition to avoid overfilling.

3. Avoid Overfilling

  • Too much oil can be just as harmful as too little. Overfilling can cause foaming and reduce the oil’s effectiveness, leading to engine issues.


Signs You Might Need an Oil Check or Change

  • Dashboard Warning Light: The oil pressure or check engine light indicates there might be an issue.

  • Excessive Exhaust Smoke: Blue or gray smoke can mean burning oil.

  • Strange Engine Noises: Knocking or ticking sounds could indicate insufficient oil.

  • Burning Oil Smell: This might point to an oil leak.

If you notice any of these signs, check your oil immediately and consult a mechanic if necessary.


Tips for Maintaining Healthy Oil Levels

1. Stick to Your Oil Change Schedule

Most vehicles require oil changes every 5,000 to 7,500 miles but always follow your manufacturer’s recommendations.

2. Use High-Quality Oil and Filters

Invest in good-quality oil and filters to enhance your engine’s performance and longevity.

3. Monitor for Leaks

Check your parking spot for oil puddles or drips, which could signal a leak.

4. Keep a Spare Quart of Oil

Having the right oil on hand ensures you’re prepared for low oil levels during emergencies.

5. Listen to Your Car

Unusual noises or performance changes might mean it’s time to inspect your oil or other engine components.


Why Regular Oil Maintenance Matters

Regularly checking and maintaining your oil offers several benefits:

  • Prolonged Engine Life: Proper lubrication reduces wear and tear on engine components.

  • Improved Fuel Efficiency: Clean oil allows your engine to run smoothly, optimizing fuel economy.

  • Cost Savings: Routine oil maintenance helps avoid costly repairs down the road.


Conclusion

Checking your car’s oil is a quick and easy way to keep your engine in peak condition. By following the steps outlined in this guide, you can ensure your vehicle stays well-lubricated and ready to perform.


At Stoops Buick GMC of Muncie, we care about your vehicle’s longevity. Whether you need an oil change, advice on car maintenance, or a new ride, we’re here to help. Visit Stoops Buick GMC of Muncie to schedule a service appointment or explore our inventory today!


Recommended Posts

logo

How Do You Get the Best Trade-In Price for Your Car?

You get the best trade-in price for your car by knowing its value, preparing it properly, and comparing your offer before signing paperwork. Trading in your current vehicle can make your next car purchase easier. Instead of dealing with private buyers, messages, test drives, and payment concerns, you can apply your vehicle’s value directly toward your next purchase. The key is preparation. A clean, well-documented, fairly priced vehicle is easier for a dealer to evaluate and often puts you in a better position when it is time to talk numbers. Top 3 Takeaways Research your vehicle’s trade-in value before visiting the dealership so you know what a fair offer looks like. Clean your car, gather paperwork, and fix small issues that may affect the appraisal. Focus on the full deal, including trade-in value, vehicle price, taxes, fees, and financing terms. 1. Understand the Trade-In Process Trading in your car is a straightforward process, but it requires preparation and knowledge. Here’s what to expect: Initial Assessment: Before you visit a dealership or trade-in service, it’s important to understand the current value of your car. This will give you a benchmark for negotiating your trade-in price. Dealer vs. Private Sale: While you can sell your car privately for potentially more money, trading it in at a dealership can be convenient and quick. Dealers typically offer lower prices compared to private sales because they need to make a profit when reselling the vehicle. Incentives and Promotions: Some dealerships offer trade-in incentives or promotions, such as extra cash for your vehicle or rebates on a new car purchase. It’s worth checking these offers to see if they align with your situation. 2. Prepare Your Car for Trade-In Before you take your car to a dealership or trade-in service, it’s essential to prepare your vehicle to ensure you get the best possible price. Here’s what you should do: Clean Your Car: A clean car gives the impression of good maintenance. Wash and vacuum the interior, clean the windows, and remove personal items. A well-maintained vehicle is more attractive to potential buyers and will often lead to a higher trade-in offer. Repair Any Issues: Take care of minor repairs before your trade-in appointment. Issues like dents, scratches, worn-out tires, and broken headlights can significantly impact your car’s value. If there are repairs you can’t afford, consider getting estimates so you can use them as leverage during negotiations. Gather Documentation: Collect all relevant documents for your car, including the title, service records, and maintenance history. Having these documents can demonstrate that your car has been well cared for and help justify a higher trade-in price. 3. Know Your Car’s Value To get the best trade-in price, you need to know the fair market value of your car. Several online resources can help you estimate your car’s value: Kelley Blue Book (KBB): KBB provides a reliable estimate of your car’s value based on its make, model, year, condition, mileage, and features. You can use KBB’s trade-in calculator to get an idea of your car’s worth. Edmunds: This site also provides trade-in value estimates. It includes factors like location and vehicle condition, which can affect the final price. NADA Guides: The National Automobile Dealers Association (NADA) offers another trade-in tool that’s useful for understanding your car’s value. Local Market Research: Check local listings for similar cars to see what buyers are willing to pay. This will give you a realistic idea of what to expect. 4. Negotiating Your Trade-In Price Negotiation is a critical part of the trade-in process. Here’s how to handle it: Be Prepared to Negotiate: Once you have your car’s estimated value, be prepared to negotiate with the dealer. Remember, they may offer less than your car’s value to leave room for profit. Start High: If you’re offered a price lower than expected, don’t be afraid to counteroffer. Starting higher than your estimated value allows you room to negotiate down to a fair price. Know Your Bottom Line: Before you go to the dealership, determine the minimum amount you’re willing to accept for your trade-in. Stick to this number during negotiations. Use Leverage: If you’re considering a new vehicle purchase, use the trade-in value as leverage in your negotiations. For example, if you’re trading in a car for a new one, emphasize that a higher trade-in price will make the new car more affordable. 5. Be Mindful of Taxes and Fees When trading in your car, the value offered may not be the final amount you receive. Taxes and fees can affect the total: Sales Tax Credit: Many states allow you to apply the value of your trade-in towards the sales tax of your new vehicle purchase. This can reduce the amount you owe in taxes when buying a new car. Documentation Fees: Some dealerships may charge administrative or documentation fees when processing your trade-in. Ask for a breakdown of any additional costs so you know what you’re paying. 6. Negotiate Beyond the Trade-In When negotiating your trade-in value, don’t forget to consider the total cost of the new car: Bundle Offers: Some dealerships offer discounts if you trade in your car and purchase a new one from them. Ask about bundling offers, such as lower interest rates or cash rebates. Financing Options: If you’re trading in for a new vehicle, ask about financing options. The trade-in value can often be used as a down payment or reduce the monthly payments. 7. Get Everything in Writing Once you agree on a trade-in price, make sure all terms and conditions are in writing: Bill of Sale: Ask for a bill of sale detailing the trade-in price, any deductions, and the final amount credited towards your new vehicle purchase. Vehicle History Report: If your car is older or has a unique history, provide the dealership with a vehicle history report. This can help justify the trade-in price. Sales Contract: Review the sales contract carefully. Ensure that the terms agreed upon are reflected accurately in the paperwork. Conclusion Getting the best trade-in price for your car requires preparation, research, and negotiation skills. By understanding the trade-in process, knowing your car’s value, and exploring multiple offers, you can maximize your trade-in value and make your next vehicle purchase more affordable. Whether you’re upgrading to a newer model or simply need to sell your car, taking the time to prepare can make a significant difference in the final price you receive. If you’re ready to trade in your car and find your next vehicle, visit Stoops Buick GMC of Muncie. Our team is here to help you through every step of the process, from valuing your trade-in to securing financing and finding the perfect car. Frequently Asked Questions About Getting the Best Trade-In Price for Your Car How can I get the most money for my trade-in? You can get the most money for your trade-in by cleaning your car, bringing service records, researching its value, and comparing your offer. It also helps to fix small issues that are inexpensive to repair. Should I clean my car before trading it in? Yes, you should clean your car before trading it in. A clean vehicle creates a better impression and can make the appraisal process smoother. Do dealerships care about service records? Yes, service records can help show that your vehicle has been maintained properly. They may not guarantee a higher offer, but they can support your case during the appraisal. Is it better to trade in a car or sell it privately? Trading in is better if you want convenience, speed, and simple paperwork. Selling privately may be better if you want to try for a higher price and do not mind the extra work. Can I trade in a car that I still owe money on? Yes, you can usually trade in a car that still has a loan. The dealership will calculate your payoff and apply your vehicle’s value toward that balance or your next purchase. What lowers the value of a trade-in? High mileage, accident history, worn tires, mechanical problems, interior damage, missing keys, and poor maintenance history can lower a trade-in offer. Market demand also plays a role.

logo

What to Look For When Buying a Used Car: A Comprehensive Guide

Purchasing a used car can be a smart financial decision, but it also requires careful consideration. Understanding what to look for can help you avoid pitfalls and ensure you make a wise investment. This guide covers essential factors to consider when buying a used car, from initial research to the final purchase. Why Buy a Used Car? Before diving into specifics, let's explore the benefits of buying a used car: Cost Savings: Used cars are generally more affordable than new ones, making them accessible to a broader range of buyers. Depreciation: New cars lose value quickly. By buying used, you avoid the steep depreciation that occurs in the first few years. Variety: The used car market offers a vast selection of makes and models, allowing you to find a vehicle that meets your needs and preferences. Steps to Take Before Buying a Used Car 1. Research Your Options Before you start looking at cars, do your homework: Determine Your Budget: Decide how much you can afford, considering not just the purchase price but also insurance, registration, and maintenance costs. Identify Your Needs: Consider your lifestyle and needs. Do you need a family car, a commuter vehicle, or something sporty? Make a list of must-have features. 2. Choose the Right Model Some vehicles hold their value better than others or have a reputation for reliability: Check Reviews and Ratings: Research the models you are interested in. Websites like Edmunds, Kelley Blue Book, and Consumer Reports provide valuable insights into vehicle performance, reliability, and owner satisfaction. Consider Maintenance Costs: Some makes and models may have higher maintenance costs. Research the average cost of repairs and parts for the cars you are considering. Inspecting the Used Car 3. Check the Vehicle History Report A vehicle history report provides crucial information about a car's past: Obtain a Report: Use the car’s VIN to get a report from services like Carfax or AutoCheck. Look for details about accidents, title status, ownership history, and service records. Look for Red Flags: Pay attention to any inconsistencies in the report. Multiple accidents, flood damage, or title issues should raise concerns. 4. Examine the Exterior The car’s exterior can provide valuable clues about its condition: Inspect for Damage: Look for dents, scratches, or rust. Check for mismatched paint, which may indicate previous repairs. Assess Tires: Inspect the tires for even wear. Uneven wear can signal alignment issues or suspension problems. 5. Evaluate the Interior A thorough interior inspection is essential: Check Upholstery and Dashboard: Look for signs of wear, such as rips or stains. Ensure all controls, lights, and features work properly. Smell for Odors: Be alert for musty or unusual odors, which may indicate water damage or other issues. 6. Test the Engine and Components The engine is the heart of the vehicle. Here’s what to check: Start the Engine: Listen for any unusual noises, such as knocking or ticking. A smooth start is a positive sign. Check Fluids: Inspect oil, coolant, and transmission fluid levels. Dirty or low fluids can indicate neglect. Look for Leaks: Check underneath the vehicle for any signs of leaks, such as oil spots or fluid puddles. Test Driving the Used Car 7. Take a Test Drive A test drive is crucial to evaluate how the car handles: Assess Comfort and Visibility: Ensure the seats are comfortable and that you have good visibility from the driver's seat. Test Acceleration and Braking: Pay attention to how the car accelerates, brakes, and handles turns. Listen for any strange sounds during the drive. Check Technology Features: If the car has modern technology, ensure all features, such as navigation, Bluetooth, and infotainment systems, function properly. 8. Consider a Professional Inspection For added peace of mind, consider hiring a mechanic: Pre-Purchase Inspection: A trusted mechanic can provide a thorough inspection to uncover hidden issues. This step can save you money in the long run. Understand the Cost: While this may involve an upfront fee, the investment can prevent costly repairs after the purchase. Finalizing the Purchase 9. Negotiate the Price Once you’ve completed your research and inspections, it’s time to negotiate: Know the Market Value: Use online resources to understand the fair market value of the car. This knowledge will empower you during negotiations. Be Prepared to Walk Away: If the seller is unwilling to negotiate fairly, don’t hesitate to walk away. There are plenty of options in the used car market. 10. Complete the Paperwork Before finalizing the sale, ensure all paperwork is in order: Title Transfer: Ensure the title is signed over to you. Verify that there are no liens on the vehicle. Bill of Sale: Always obtain a bill of sale that outlines the terms of the transaction. This document serves as proof of purchase. Additional Tips for Buying a Used Car 11. Look for Warranties and Guarantees Some used cars come with warranties, which can offer peace of mind: Manufacturer’s Warranty: If the vehicle is still under the manufacturer’s warranty, you may benefit from coverage for repairs. Certified Pre-Owned Programs: Consider certified pre-owned (CPO) vehicles, which often come with extended warranties and thorough inspections. 12. Consider Financing Options If you need financing internal link to credit app, shop around for the best rates: Credit Union or Bank Loans: Check with credit unions or banks for loan options. Compare interest rates and terms to find the best deal. Dealership Financing: Some dealerships offer financing options, but ensure you understand the terms and conditions. 13. Be Wary of As-Is Sales Understand the implications of buying a car "as-is": Limited Recourse: An "as-is" sale means you accept the car in its current condition without warranties. Be cautious, and ensure you conduct thorough inspections before proceeding. Conclusion Buying a used car requires careful consideration and thorough research. By knowing what to look for—such as vehicle history, condition, and performance—you can make an informed decision. Taking th e time to inspect the vehicle, test drive it, and negotiate effectively will help you secure a reliable car that fits your needs. For more information on buying a used car or to explore our inventory, visit Stoops Buick GMC of Muncie.

logo

How Often Should You Rotate Your Tires? Everything You Need to Know

Keeping your tires in good condition is essential for your vehicle’s safety and longevity. Tire rotation plays a crucial role in achieving that. But how often should you rotate your tires, and why is it so important? Let's break it down. Why Tire Rotation is Necessary Tire rotation is the practice of moving your tires from one position to another on your vehicle to ensure even wear. Over time, factors like weight distribution, driving habits, and road conditions cause uneven wear. If you don’t rotate your tires regularly, your front tires may wear down faster than your rear tires, especially if you drive a front-wheel-drive vehicle. Tire manufacturers recommend rotating your tires to maximize their lifespan. Regular tire rotation keeps the tread wear even among all four tires, improving performance and extending the life of your tires. Without this routine, you may find yourself buying new tires sooner than expected. How Often Should You Rotate Your Tires? So, how often should you get your tires rotated? The general rule is to rotate your tires approximately every 5,000 to 8,000 miles. This can also align with every oil change or every other oil change. If you drive frequently or under harsh conditions, you may need a tire rotation more often. Some vehicles, especially those with performance tires, may have different needs. Checking your car’s tires and following the tire manufacturer’s recommendations is key. Your tire technician can also advise you on the best tire rotation pattern based on your driving habits. Signs You Need a Tire Rotation How do you know when it’s time to rotate your tires? Uneven wear patterns on the tread are one of the biggest indicators. If you notice uneven wear, it's likely time for a tire rotation. Other signs include: Your vehicle pulling to one side Vibration in the steering wheel Tread depth differences between your front tires and rear tires If you can’t remember the last time you had your tires rotated, it’s probably time to schedule an appointment for a tire rotation. Benefits of Regular Tire Rotations Tires tend to wear unevenly due to different factors, such as the weight distribution of your vehicle, your driving style, and whether your vehicle is front-wheel drive or rear-wheel drive. Regularly rotating your tires can help: Extend the life of your tires Improve fuel efficiency Enhance vehicle performance Maintain better traction and braking By keeping your tires rotated every few thousand miles, you prevent uneven wear patterns and maximize your tire's performance over time. What’s the Best Tire Rotation Pattern? The rotation pattern depends on your vehicle’s drivetrain and the type of tires you have. For front-wheel-drive vehicles, it’s common to rotate tires front to back or side to side, while rear-wheel-drive vehicles might require a different pattern. If you have directional tires, they need to remain on the same side of the vehicle during rotation. Your tire technician will know the best tire rotation pattern for your vehicle based on its specifications and your driving habits. Factors That Influence Tire Wear Tire wear isn’t the same for every vehicle. Factors like weight distribution and driving style affect how quickly your tires wear down. For example, front tires on front-wheel-drive vehicles wear faster than rear tires. Similarly, the left front tire may wear differently from the right rear tire depending on how you drive. Routine tire care and maintenance are vital in extending the life of your tires. When you rotate your tires, you're giving them a better chance to wear evenly, which leads to a longer lifespan. When Should You Buy New Tires? Even with proper tire rotation, tires will eventually wear out. Check your tire tread regularly to ensure it's not too worn. If you notice uneven tread or your tires have lost significant depth, it may be time to buy new tires. Worn tires can compromise your safety, so don't wait too long. Conclusion Rotating your tires is a key part of vehicle maintenance. Whether you drive a front-wheel-drive car, rear-wheel-drive, or use performance tires, keeping up with tire rotation will extend the life of your tires, improve performance, and help you avoid unnecessary tire replacements. So, if you’re asking yourself, "How often should I rotate my tires?" remember, every 5,000 to 8,000 miles is a good rule of thumb. Keep an eye on your tread and stay on top of regular tire care to prolong the life of your tires. For more car-buying tips, visit Stoops Buick GMC of Muncie.